#SourdoughBread
Dates
Publish Date: 5/9/25
Updates: 5/12/25
How to make great sourdough bread quickly and efficiently without taking a lot of time
My goal is to come up with the best tasting, most efficient way to bake sourdough bread at home within 12 to 24 hours when you first want it.
Features of the no dicking-around sourdough method
- 15 min or less total time Spent prepping, mixing, cleaning, while baking bread
- New bread ready in 12-24 hours
- Minimal or no flour waste and discard
- Minimal equipment
- Minimal cleanup
- DIY minimal waste starter method
- Hardware cost less than $40 (Assuming you have a cast iron Dutch over and oven)
- Minimal dicking around = IE: minimal time between the thought of “I want sourdough bread” to eating or sharing freshly baked sourdough bread with your family and friends
Overview
I want to reduce the amount of wasted discarded flour and have a system in which at any time I want sourdough bread, I can make it. I’m calling this to “No Dicking Around” sourdough bread process. We have all seen hours and hours of YouTube videos and blog posts showing us how to make Sourdough Bread, however many of them are all very tedious and there’s a lot of steps, wasted resources, and cleanup.
My goal is to minimize the amount of time needed to make sourdough bread and be able to spend no more than 20 minutes of effort anytime you wanna bake sourdough bread. This process includes 3 simple incredients: flour, water, and salt and consists of mixing the starter, flour, salt and water into a new mix for baking sourdough bread and then setting up a new batch of starter to be ready for new bread within 12 to 24 hours on demand.
Recipe
My preferred 60%-65% Hydration mix for 1kg of dough( more usable, less sticky cleanup) in clean stainless steel 1Gal mixing bowl
- 200g Starter (50 / 50 mix flour and water 100% hydration)
- 240g water
- 20 g salt (2% – more salt to taste but reduces yeast activity)
- 540g bread dough
How I make the Starter
This process of making starter from scratch may take a few days. I like the 1 tablespoon a day method to make starter.
- Day 1 Add 1 tablespoon of Flour and 1 Tablespoon of water to a Jar
- Day 2+ < – Every day add 1 tablespoon of water and flour and mix.
- Keep adding and mixing until the container is full then discard 2/3
- Continue adding water and flour until the starter doubles in a day.
- The Starter is ready to party if it smells like bread, and if it floats in water or has doubled or tripled in volume in a day.
The first time I made starter I was feeding for almost 2 weeks and was using way more per the king arther discard method and almost went through an entire bag of flour before one weekend I left it out on the counter on the microwave and came home to the starter exploding out of the jar I had it in.
Bread Baking Process when Starter is Ready to Party
Take Starter our of fridge and mix into a 1 Gallon stainless steel bowl mixing with a bread mixer using a chopstick to remove the dough from the mixer between mixing rounds and at the end of the first mix.
- In a 1 Gallon Mixing Bowl add Starter, water, and salt first and stir with chopstick until mixed – 50 stirs
- Add flour and mix with mixer utensil – 50 stirs or until all the flour is hydrated
- Wait 1 hour
- Rotate and fold with trowel (Sometimes there is dry flour still in the bottom of the bowl. If this happens I add 10-20g of water to hydrate the dry flour.
- Wait 1 hour
- Fold with trowel
- Wait 2 hours
- Put in fridge for over night or in floured and covered proofing basket (2-4 hours)
- The Dough is ready when at room temp 65-75 degrees if the dough returns back slowly if you poke it.
- Heat oven to 450 degrees
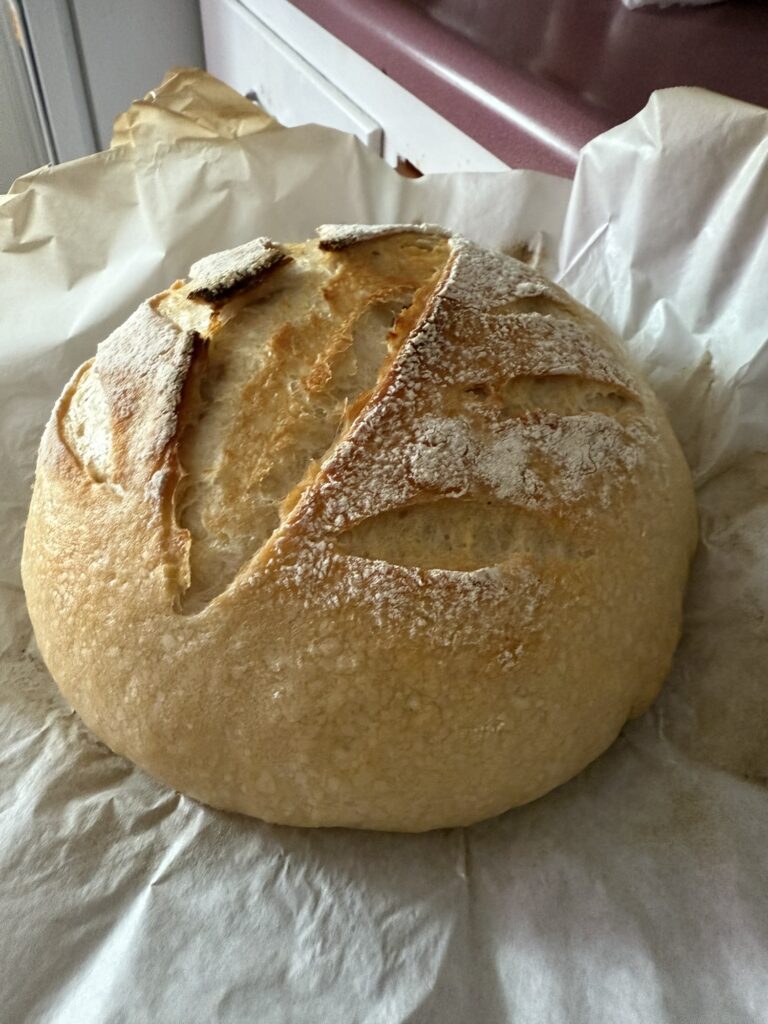
- Put proofed dough on floured parchment paper and scour with knife
- Put dough on parchment paper in dutch oven with 1-2 shot glasses of water
- Cover Dutch oven and Bake heated 450 degree oven for 20-25 min
- Lower oven temperature to 425 and open oven and take of cover of dutch oven (careful of hot steam)
- Bake for 20-25 more min until the bread is golden and / or minimally charred on top
- Let cool on baking rack until cool enough to eat but warm enough to melt butter.
No Mess and Waste Starter Maintenance
Every time I use 200g of the starter in a new bread bake, I feed my starter again with 100 g of flour and 100 g of water to the starter that’s left and then I either keep it in the fridge until the next time I want to make bread. I take the starter out at room temperature and let it double in volume or reach its highest point in the jar and then starts backing down. After it has doubled in volume I then mix it in with my flower salt and water to make new sourdough bread. If it has been over a week since I last made bread and the starter looks hungry I usually add 25 g of flour and 25 g of water to wake it back up and let it sit at room temp until it doubles or peaks.
I always leave enough starter at least 25 to 50 g to use for the next batch of bread. Essentially I use a lot of starter and each new bread and it allows me to bake bread faster. (1|2|2 if mature starter 1|3|3 if hungry starter)
here’s your after-work, dinner-prep-friendly, zero babysitting, cold-ferment sourdough method with no autolyse, no micromanaging stretch & folds, and a morning bake that slaps.
Overall Recipe with timing and tools
Makes: 1 large boule or 2 small (no-discard, no-drama)
Hydration: 65%
Start: 6–7 PM
Bake: 7–9 AM next day
Vibe: Low touch, high crust
💡 Key Features:
- No autolyse
- One mix, one – two folds as temperment and time allow
- Straight to the fridge
- Bakes directly from cold
🧪 Ingredients
| Ingredient | Amount |
|---|---|
| Bread Flour | 540-550g |
| Water (room temp) | 240g |
| Salt (Fine sea salt) | 10-20g (more for taste but slows down fermentation) |
| Active sourdough starter | 200g (100% hydration 50/50mix) |
🛠️ Equipment
- Large stainless steel or glass bowl
- Wet hands
- Bread Mixer
- Plastic Chopstick (for starter mixing and bread mixer cleanup)
- Banneton or towel-lined bowl
- Optional bread proofing box (you can also use oven with light on or moicrowave with mug of boiling water)
- Fridge space
- Baking
- Cold Dutch oven (with removeable lid)
- Parchment paper (To place bread on in Dutch oven for easy transport)
- Shot glass filled with water 2x and poured in dutch oven with bread on parchment paper (for steam)
🍞 Instructions
🍞 THE LAZY LEGEND’S OVERNIGHT SOURDOUGH
⏰ Evening Schedule (Start ~6:30 PM)
🔁 6:30 PM – Use & Feed Starter
- Pull starter from the fridge
- Scoop 200g into your mixing bowl
- Immediately feed the remaining jar: (You should always have a minimum 25-50g of starter 2TBlsp in the jar)
→ 100g flour + 100g water
→ Stir right in the same jar, with plastic chopstick clean the sides of the jar with small rubber spatula, lid on, back in fridge
→ No discard, no countertop ferment, no crusty guilt
🍞 6:35 PM – Mix Dough
- To your 200g starter, add:
→ 500g flour
→ 325g water
→ 10g-20g salt (to taste, more salt equals less fermentation party) - Mix until it’s a shaggy dough blob
- Cover the bowl
🙆 7:00 PM – Stretch & Fold #1
- Messy Hands on way:
- Wet your hand and give it 3–4 gentle stretch & folds
- Lazier less mess way:
- If you are lazier and dont want mess use flexible plastic scraper and scrape dough back into itself for about 8-12 folds while rotating the bowl 1/4 turn each fold
- Cover the bowl again
🙆 7:30 PM – Stretch & Fold #2
- One more quick fold round — it should feel stronger now
- Cover and rest
🛠️ 8:30 PM – Shape
- Lightly flour your counter
- Shape into a round (boule) or log (batard)
- Place in a floured banneton or towel-lined bowl, seam side up
- Cover with a plate or wrap
❄️ 8:45 PM – Cold Proof
- Pop it in the fridge for the night
- You can also leave it in the fridge for a few days but if you do cover with a plastic pag, shower cap, or wet towel to keep dough from drying out in fridge.
- Go relax — your dough is working while you’re not
—
🔥 Morning Schedule (Next Day)
🧻 7:00 AM – Prep for Bake
- Line parchment paper on the counter
- Take dough from fridge and gently flip onto the parchment
- Score the top confidently — you earned this
🏗️ 7:05 AM – Load Dutch Oven (Cold Start)
- Place dough + parchment into a cold Dutch oven
- Pour 2 shot glasses of water inside the Dutch oven (one on each side — not touching the dough, under the parchment paper)
- Lid on
🔥 7:10 AM – Bake
- Place Dutch oven into cold oven
- Set oven to 450°F
- Bake 50 minutes total:
→ 25 minutes lid on (steam party 💨)
→ 25 minutes lid off (crust festival 🔥)
❄️ 8:00 AM – Cool
- Remove bread from pot
- Let cool on a wire rack for 45–60 mins
- Or slice early and embrace the gooey rebellion. Up to you.
—
♻️ Starter Routine (No Waste, No Fuss)
- After removing 200g starter for your dough:
→ Feed the same jar with 100g flour + 100g water
→ Stir, lid on, right back into the fridge
→ That’s your starter for next time. No discard. Ever.
→Unless…. your starter starts to grow mold or smell way off more garbagy funky feet than fresh bread - Clean the jar between feedings if you get a funky crust anywhere in the jar or you feel its been too long since you cleaned it.
→ Scrape down sides with a spatula and
→ keep 2 TBlsp of the starter to put back in clean jar
→ Wash with only a little detergent, Rinse and restart if it looks or smells funky
→ If it’s turning into a sourdough archaeology dig, it’s time
Let me know what you think and leave your comments.